
ProTip: Setting a CheckBox Field to Default as "Checked"
Originally published on 08/03/2015
Did you know you can easily set your Checkboxes to be automatically ‘checked’ when you generate a new form?
Configuring Checkbox fields to be automatically ‘checked’ when a new form is generated is a simple, yet powerful functionality that saves users time, enforces data capture rules, streamlines data entry, and eliminates the need for teams to repeatedly ‘check’ items in their everyday mobile forms.
How to Set Up Your Checkbox Fields to Automatically Be ‘checked’
To get started, log in to GoFormz from a computer, select which form Template you wish to add this capability to, and open the Template Editor. For this example, we will use our digital invoice form Template:
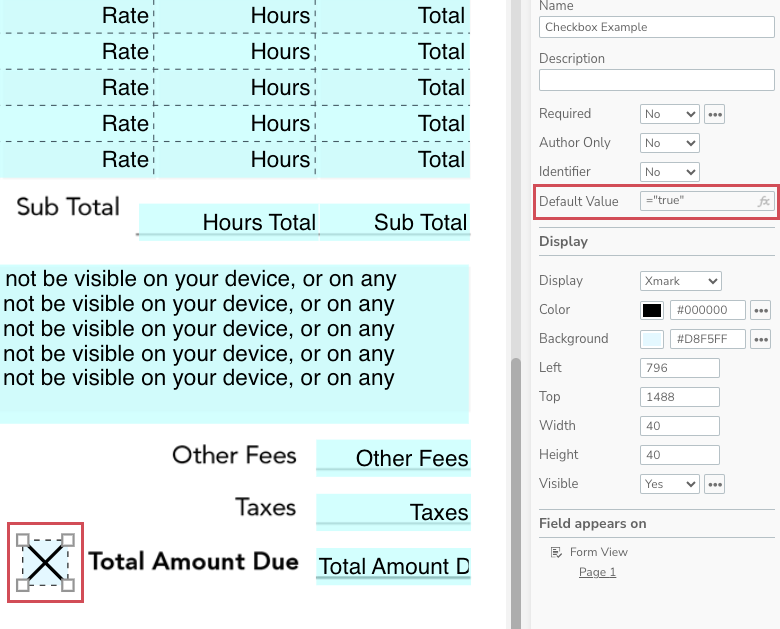
Select the Checkbox field you wish to set as ‘checked’ and navigate to the Properties Panel on the right-hand side of your screen.
To configure your Checkbox field so that it is automatically ‘checked’ when a form is generated, locate the Default Value property and add ="true". This instructs your form to mark the Checkbox field as ‘checked’ and will not be editable to the end user. If you’d like the field to be editable (so a user can ‘uncheck’ the field) use true.
Click ‘Publish’.
How to Set Checkboxes as ‘Checked’ in Reference to a Table Cell
This functionality can also be applied to Checkboxes referencing a cell within a Table field. For example, if a technician were completing an inspection on a piece of equipment, their inspection form could be generated with the Checkbox labeled ‘Repairs Not Needed’ automatically ‘checked’ by default. If the technician then noted equipment damage or repairs needed into a Table cell, the digital inspection form could then ‘uncheck’ the ‘Repairs Not Needed’ Checkbox and even ‘check’ a different Checkbox field noting ‘Repairs Needed’.
To configure your Checkbox field to reference a Table cell, log in to GoFormz from a computer, open your form in the Template Editor, and complete the following:
Locate and select your Checkbox field and navigate to the Properties Panel to the right-hand side of your screen.
To configure your Checkbox field to be automatically ‘checked’ if the Table cell(s) is empty, add the following to the Checkbox field’s Default Value: =IF([INSERT TABLE NAME HERE]![1][1]="", "true", "false"). This instructs your form to automatically mark your Checkbox as ‘checked’ when a new form is generated, and ‘uncheck’ the Checkbox once a value has been added to the Table cell.
If you wish to make an electronic Signature Required because of this checkbox selection, you will add the following calculation to the Required section in the Properties Panel =IF([CHECKBOX FIELD NAME]="", "true,", "true").
Click ‘Save changes’.
By pre-filling your Checkbox fields, you can further streamline your data capture with additional variations like capturing an electronic Signature, requiring supplementary information, or even routing forms for managerial approval. Interested in learning more about Checkbox fields and how to set up more popular Calculations to streamline the form-filling experience? Check out our calculations eBook and discover some of the most popular instant calculations that current users are using to elevate their data capture needs. Additionally, to learn more about leveraging Checkbox fields within your digital forms, check out this blog covering Checkbox Groups.
